Thursday, January 31, 2013

DIY Valentine Boxes


I made a Valentine Box for each of our kids.  I wanted to have a place where they could stash their cards and I could leave a special treat for them on the day of "Love"!  There are tons of great ideas out there and of course I always love PBK's cute Valentine holders but they cost a lot.

So I made these out of recycled boxes......


What you will need:
Cereal, waffle, butter, milk.....boxes of any size 
(I am a recycler so I loved doing this project)
Tape
Scissors
Ribbon or twine
Scrap book paper
Pen
Your creativity!


1.  Cut the box of your liking down to the size of your liking


 2. Trace each side of your box onto your scrapbook paper 
and cut 


3.  Tape your scrapbook paper cuts to the appropriate side of the box 
with either clear tape of double sided tape (depending on how anal you are;)


4.  Cut long strips of another scrapbook paper pattern 
and attach to the box like below (sorry for the fuzzy pic)


5.  This is what the bottom of the box will look like

(I covered the bottom with an extra piece of the navy and white scrapbook paper)

6.  Cut out a heart and stick it to the front side of the box


7.  Punch holes in the side of the box and tie your ribbon or twine to the box


8.  There is SO MUCH room for YOUR CREATIVITY in this project.  
You could get our your Cricut
You could get out the glitter
You could get out the stickers
You could even BeDazzle this bad boy (if you are into BeDazzling!!!!)
You could let your kids decorate the box.


These are going to hang on the back of my kids breakfast room chairs.
I am thinking about adding hooks to the back of our chairs like this


Wednesday, January 30, 2013

Valentine Treats: Cheese Cake Tarts


Here is recipe that I L.O.V.E.  One of our life-long family friends makes these for various different occasions and I think they would work nicely for any Valentine Party/Celebration.


Here is what you need:

2 pkg of 8oz cream cheese (softened)
3/4 cup white sugar
2 eggs
1 Tablespoon of lemon juice
1 Teaspoon of vanilla
Vanilla Wafers
1 can of strawberry pie filling (you could use cherry or blueberry too)
1 package of foil cupcake liners


Mix all of the ingredients together until smooth


 Place cup cake liners in muffin tin. 
 Place a vanilla wafer in the bottom of each cup cake liner. 


Pour mixture into cup cake liners (almost to the top)
Bake at 350 for 15 min 


Here is what they should look like when they are done


Cool and top with a spoonful of pie filling

*These should be refrigerated when not eating*


Cute, sweet and if you are in my mom's group you are going to get to enjoy these treats on Thursday night. 
 That is....if I don't eat them all before then!

Tuesday, January 29, 2013

Valentine Mantel


I love mantels!  And I love decorating them for the seasons.  Here is what our Valentine Mantel looks like and how I did it.  ENJOY!


1.  I made a chalkboard a few weeks ago.  HD offers it in 2x4 size.  I had the chalkboard cut to 2x3 so it would fit in the frame I purchased.  I saved the 1x4 left over and wrote the word "Love" on it.  I used regular chalk and placed it on the mantel. 


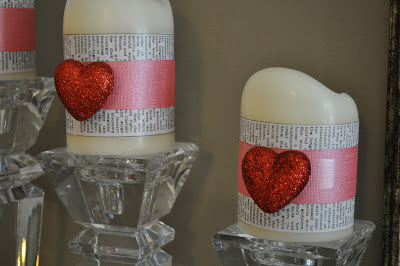
2.  I wrapped candles with newspaper wrapping paper (but you could use regular news paper).  And then wrapped a shimmer scrap book paper on top.  And then secured some foam glitter hearts on top of the papers.  Everything is secured with tape.


3.  I added a little "pink" touch to the frame that always makes it's home over our mantel.  I just took some pretty papers and layers them like I did the candles.  Everything is secured with tape. Easy Peasy.


4.  I made a wreath.  Very simple.  I just covered a wreath in strips of newspaper wrapping paper (from the Target dollar section).  Then I secured glitter hearts (also from the Target dollar section) to the wreath.  The paper is secured to the wreath with tape and the hearts are secured with straight pins.  


Hope you got some fun ideas from this mantel project.  Would love to hear what you are up to for mantels this valentines.  Please share in the comment section below!


Monday, January 28, 2013

Valentine's Center Piece


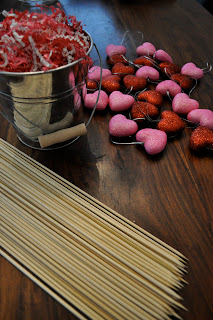
If you are looking for a quick, easy and inexpensive center piece for your valentine's table check out the project below.  My 2 year old loved being a part of this one. 


What you will need:
Wooden skewers (you could paint these. I just left mine natural for lack of time)
Foam hearts (mine came from the dollar store. They were intended to be ornaments. I just cut the strings off of the tops)
Tin bucket (mine came from the dollar bin at Target)
Crinkled strips of paper (found in the gift wrap section of any store)
Heart garland


Fill the tin bucket with the crinkled strips of paper
Push a wooden skewer through the bottom of each foam heart


Insert heart skewer into the tin bucket with crinkled strips of paper


 Place on your table
Arrange heart garland around the tin bucket


Who knows.....your two year old might even come up with some ideas of her own from this project!


Friday, January 25, 2013

Kids Bathroom: Bows and Thrones!


I tackled the bow issue right before or after my daughter was born.  Girls get and mom's buy ALOT of bows.  I am thankful I only have one girl;)  Here is a bow holder that I made for my daughter.  We have lost a few bows along the way and I need to make/buy a few more colors but for the most part...this is where they stay.

It's durable.  It's waterproof.  It has plenty of room.  And it is out of the way!  Yay!


We started potty training back in June and I can thankfully say that we have had success.  I loved the "frog" potty that we used in the initial stage but honestly our kids bathroom is small and is shared with our guests.  So once she got the hang of the potty down, we purchased a "seat for the seat".  But I hated the way it was either always on the seat or in the floor (sick).


I found a HUGE M3 hanger at Target that was sure to hold that bad boy secure.  I secured it to the side of the toilet and viola!  She now uses the potty, gets down, hangs her seat up and flushes!  It is a beautiful thing! 


Hopefully my #2 born will love the idea too. 
(Hope he won't mind using a princess potty....cause I don't see her giving up her "throne" anytime too soon)! ;)

Happy Weekend!  Lots of fun ideas coming next week!